SSIS Script Task – The Script Task is corrupted

Having moved an SSIS package to a new server it was failing to run with the errors below.

%Script Task Name%:Error: There were errors during task validation.

%Script Task Name%:Error: The Script Task is corrupted.

%Script Task Name%:Error: There was an exception while loading Script Task from XML: System.Exception: The Script Task “ST_…” uses version 15.0 script that is not supported in this release of Integration Services. To run the package, use the Script Task to create a new VSTA script. In most cases, scripts are converted automatically to use a supported version, when you open a SQL Server Integration Services package in %SQL_PRODUCT_SHORT_NAME% Integration Services. at Microsoft.SqlServer.Dts.Tasks.ScriptTask.ScriptTask.LoadFromXML(XmlElement elemProj, IDTSInfoEvents events)

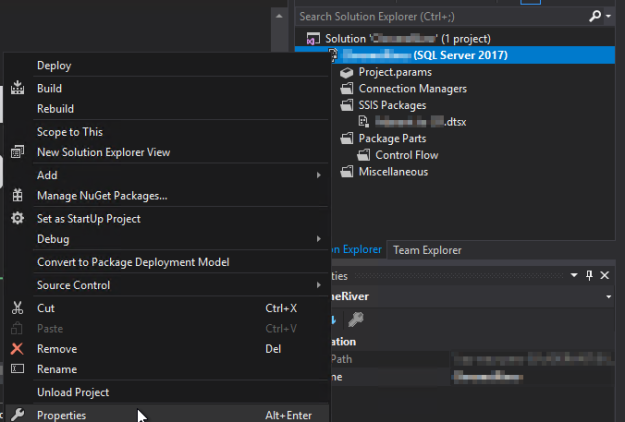
The resolution is to change the SSIS project TargetServerVersion property.  Right-click on the project an choose Properties.

ssis error 1

On the screen that loads change the TargetServerVersion value to the version of SQL Server you’re using.  Save and build your project, then re-deploy.

SSIS Error 2.png

A significant part of sql server process memory has been paged out.

Looking through the SQL Server log shortly after the server started I saw:

A significant part of sql server process memory has been paged out. This may result in a performance degradation. Duration: 0 seconds. Working set (KB): 128084, committed (KB): 423936, memory utilization: 30%.

This is on a Windows Server 2012 R2 VM with SQL Server 2008 R2, 8GB RAM and a maximum server memory configuration of 6144MB.  Lock pages in memory is enabled for the SQL Server service account.  There are many reports of this error from the Windows Server 2003 x64 and SQL Server 2005 era, but little information from more recent times. 

The message is saying that a large amount of the memory allocated to the SQL Server process, sqlservr.exe, has been moved from RAM to the page file as the process’ working set has been trimmed.  In the case of  the message above the SQL Server process has a working set of 128084KB of memory allocated in RAM and a total memory allocation which could be in RAM or on disk of 423936KB.  The memory utilisation value of 30% is showing that ~30% of the SQL Server process’ total memory allocation is in RAM, which is the working set value.  This warning message is raised when the memory allocation in RAM (working set) is 50% or below the committed memory value.

In the case of this server the working set and committed values are low compared to the maximum server memory setting and Task Manager was showing ~2.5GB of the server’s 8GB RAM in use.  Following research I found this MSDN blog article which discusses working set trim warning messages early in the SQL Server startup phase, or shortly after the server is ready for user connections.  Based on this article it appears that in my case I can ignore the warning as the message values are low compared to the server max memory setting and there is little activity on the server.


Azure Backup File – iSCSI Error

When using the file recovery feature of Azure Backup I encountered an error when trying to mount the recovery point.  I ran the exe from the Azure Portal using an elevated command prompt, but received the error “Exception caught while connecting to Target.  Please retry after some time.”

AzureBackup0

It turns out that the error is caused by the use of the elevated command prompt.  When right-clicking on the exe and choosing “Run as administrator” the error doesn’t occur.

AzureBackup1

Azure N-series VM BSOD

When creating an Azure NV6 VM with Windows 10 the VM blue screened when installing the NVIDIA GRID drivers (411.81) either through the Azure extension, or manually as per the guidance here.  The blue screen error was System Service Exception for nvlddmkm.sys.

I discovered that the issue was specific to Windows 10 1809 as when I installed the drivers on Windows 1803 the error didn’t occur.  It’s likely that 1809 will be supported in a newer driver.

SSIS Package Incompatible in SSDT and Visual Studio 2017

Having installed Visual Studio 2017 Professional with the SQL Data Tools component I tried to open a SSIS package.  This failed to load and was listed as incompatible and that the application wasn’t installed.

I ran the SQL Server Data Tools (SSDT) install and added the SQL Server Integration Services component to my existing Visual Studio installation.  Unfortunately, it was still showing as incompatible and that the application wasn’t installed.

The resolution was to right click on the project and click reload.  This reloaded the project files from disk and I was able to edit the package.

SQL Server log truncation fails with Veeam Backup & Replication

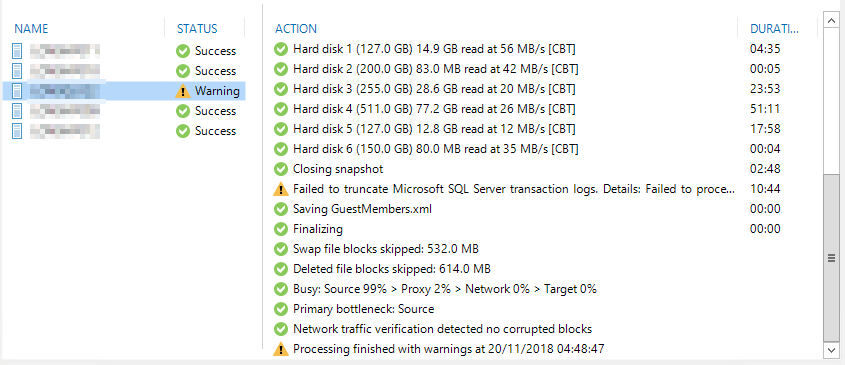
When using Veeam Backup & Replication 9.5 to backup SQL Server 2012 databases the transaction log was failing to be truncated for one database.  The database was using the full recovery model and the user account specified in Veeam’s Application Aware Processing had the required permissions and was successfully truncating the log of other databases on the same SQL instance.  The warning is displayed in Veeam as below.

SQLLog1

Veeam logs additional information in the VeeamGuestHelper log in C:\ProgramData\Veeam\Backup\VeeamGuestHelper_DATE.log.

SQLLog2

To resolve the error I added the following registry keys in the two locations below.  In my case the full registry path didn’t exist under Wow6432Node so I had to create it manually.

HKEY_LOCAL_MACHINE\SOFTWARE\Wow6432Node\VeeaM\Veeam Backup and Replication\

HKEY_LOCAL_MACHINE\SOFTWARE\VeeaM\Veeam Backup and Replication\

Name: SqlExecTimeout
Type: DWORD
Value: 600

Name: SqlLogBackupTimeout
Type: DWORD
Value: 3600

Name: SqlConnectionTimeout
Type: DWORD
Value: 300

If you’re encountering this error it my be due to a large number of SQL Server virtual log files (VLFs).  See these blog posts for more information on the issue and how to resolve it.

A Busy/Accidental DBA’s Guide to Managing VLFs

Transaction Log VLFs – too many or too few?

SharePoint Service Pack 1 – Installation of this package failed

When installing SharePoint 2013 service pack 1 on a SharePoint farm, the extraction of the service pack kept failing on one web front end.

When clicking on the officeserversp2013-kb2880552-fullfile-x64-en-us.exe file, the User Account Control dialog appeared, then when I continued to extract the files, the process failed with “The installation of this package failed”.

SP1-Error-1

Looking the service pack log file showed that some files were successfully extracted before the error.

SP1-Error-2

In order to work around the error on this server I found I needed to open an administrative command prompt and then run the service pack.


Azure IaaS Cost Optimisation

When talking to people about Microsoft Azure one of the biggest concerns is cost management and how to avoid runaway spend.  In this post I’ll share my tips for optimising Azure expenditure.  In my organisation I’ve used these tips to reduce Azure expenditure by around 50%.

Right size CPU

If you use the Azure portal to create a Windows Server 2016 VM, the default size as of Nov 18 is a DS1 v2 which costs £72.36 a month in West Europe.  If you don’t take the time to check what’s the most appropriate VM series and size you could be paying more than you need to, or under sizing your VM.  If you’re running a low end production server, or dev/test server, you could use a B series VM such as a B2S, which costs £35.26 a month.  In this case you’ve instantly saved ~50%.

Information on VM sizes is available here.  If you’re sizing for a workload that requires high storage throughput take care to check the disk IOPs and throughput measurements.  You don’t want to under size your VM, but you don’t want to over pay either.

When sizing for high CPU performance check the compute benchmark scores as the CPU performance varies between VM series.

If you want to resize a VM, Azure Automation is a great way, see here for example code in PowerShell.

Right size disk

If you use the Azure portal to create a Windows Server 2016 VM, the default disk type is premium SSD.  A 128 GB  premium SSD disk is £16.16 a month.  If you don’t require a single instance SLA, or high performance, you could use a standard SSD disk at £7.15 a month + transaction costs.  Again, this is a ~50% saving.

Information on disk type is available here.  If you chose to use premium storage for performance reason be sure your workload can utilise the disk fully.  Information on how to monitor this is available here.

Managed disks allow you to switch between the disk types, e.g. standard HDD, standard SSD and premium SSD.  You can use Azure Automation to automate the change, see here for example code.

Right time

Once you have the right VM and disk types think about when you need to run the VM.  If you have a dev/test workload you could use automation to only run the VM during the working day, 08:00-18:00.  By running the VM for 10 hours a day rather than 24 you can save significantly on the compute costs.  Note that you continue pay storage costs when the VM is turned off.

From the VM blade in the Azure portal you can configure auto-shutdown to turn of the VM at a set time each day.  For more advanced start/stop scenarios look for PowerShell solutions such as this.

Reserved Instances

Reserved Virtual Machine Instances enable you to make significant savings on compute costs.  The saving varies by VM series and the duration of the reservation, but 1 year reservation for a D2s v3 VM is 36%, and for a F2s v2 it’s 24%, both significant savings.

Clean up

Don’t waste money on resources you no longer need.  As mentioned earlier, even if you turn off a VM you still pay storage costs.  If you delete a VM the disk is left behind, again costing money.  Azure Automation is a great way to identify and remove unattached disks, see here for example code.  Don’t forget to look for other resources that are no longer used, e.g. unattached public IP addresses.

Tagging

When you create a resource group, add appropriate tags to enable you to identify the system, owner and role for the resources contained with it.  Use automation to cascade the tags to all resources within the group; example code is available here.  You can then use Power BI as I describe here to create detailed reports on usage by tag, resource type etc.  Combining tagging with Power BI is a very powerful combination.
SharePoint 2013 – Sorry, something went wrong

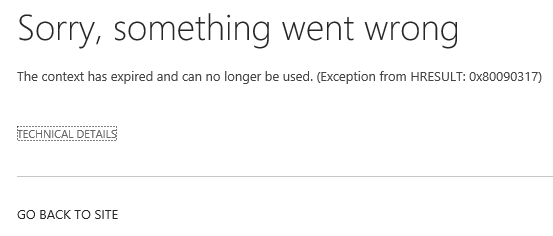
Following some work on SharePoint, users were encountering the error “Sorry, something went wrong.  The context has expired and can no longer be used. (Exception from HRESULT: 0x80090317)”

SP-Content-Expired-0

Searching the web uncovered suggestions to change the claims token timeout value, reducing it from its default value of 24 hours, to something much lower, like 1 hour.  You can check the current value, shown in minutes, using the command below.

stsadm.exe -o getproperty -propertyname token-timeout

In my case the value had already been reduced to 1 hour, so I decided to set it back to the default of 24 hours using the command below.  This resolved the error.

stsadm.exe -o setproperty -propertyname token-timeout -propertyvalue 1440

Windows cannot install required files error 0x80070570

I recently encountered an issue where a server wouldn’t install any Windows Updates, whether directly from Microsoft, or if downloaded from the Windows Update Catalog.  The error message received was “Windows cannot install required files error 0x80070570” and this is how I resolved the error.

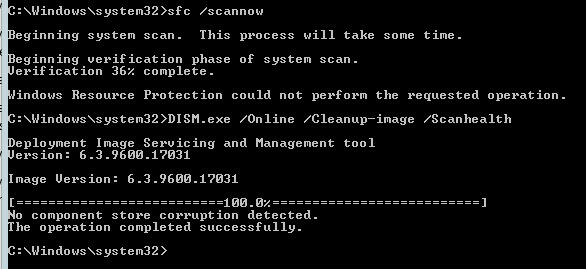
From an administrative command prompt I ran the System File Checker using sfc /scannow.  This stopped with an error at 36%.  The log for sfc is in the %windir%\Logs\CBS folder.

Next, I used the Deployment Image Servicing and Management (DISM) tool to perform a health scan of the Windows system files.  Again, I ran this from an administrative command prompt, Dism /Online /Cleanup-Image /ScanHealth, but it showed no errors.

WUError-1

Despite the fact no corruption was detected, I ran the following command to fix corruption, Dism /Online /Cleanup-Image /RestoreHealth.  In my case, rather than using Windows Update to retrieve fresh files, I used the /Source switch to point to a copy of the SXS folder from a Windows installation ISO.

WUError-2

Having fixed the corruption Windows Updates now installed.